Home | Steps | Steps | Wood Work | Wood Work | Gates | Walls | Porches | Garden Details | Rock Work | Rock work | Paths | Paths | Patios | Patios | Lawns | Mosaics | Flower gdns | Sloping Sites | Rose Gardens | Rose Gardens | Rose Gardens | Water Features | Water Features | Water Features | Low water usage gardens | Sheds | Wildlife Friendly Gardens | Interesting Items | Interesting items | Interesting Items | Bodil's Garden | Bodil's Patio | E-SCAPES: Examples | E-SCAPES: info to send. | E-SCAPES: Order form | Work in progress | Pay your KD bill via CC.
KIRBY DESIGNS ... Portfolio
Work in progress

The idea is to show the progress of our current job so that the client's mom/dad/ friends (my brother!) on the other side of the continent/world can watch the garden as it evolves. This page is an experiment and if it isn't as dynamic as I imagine, or if the client doesn't like the idea, it will dissapear!  Don't forget that our plans are not cast in concrete (figuratively); should the client want to change something at any time, it will be changed. Do not be surprized if the original material starts out as Connecticut Blue, but ends up as Green Indian Limestone, or the  Jacaranda at the focal point gets changed to Tulipefera.
Exact locations will never be disclosed.                                                          KDs: (650) 949-5078

jseimage000.jpg

.
.
.
 
.
The grand plan: Design of one side of the octagon.
Design and choice of tiles are credited to  artist, Jeannine Redon and her computer assistant Ms Tan Vess.
.
.
 

jsetilelayout1.jpg

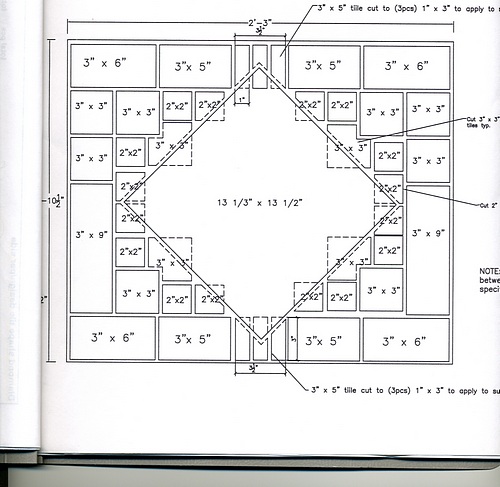
The tile lay out for side one.
Click to see details.

jsecourtyardftn30003.jpg

jsecourtyardftn20002.jpg

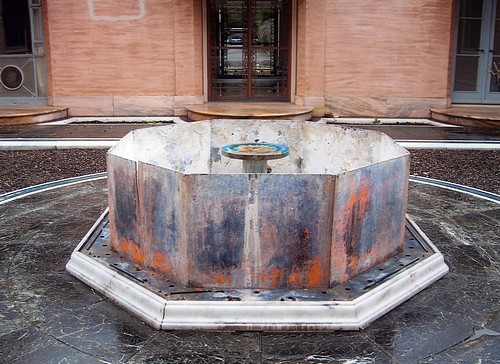
The poor old fountain had fallen into a dilapidated state. So ugly, the decision was made to remove it. However, being built of steel from the ship yards it proved to be indestructable. After three cuts had been made with a giant diamond saw the contractor decided it was too diffucult and gave up! It looked as if the once grand old fountain was to be given a possible reprieve. You can see these cuts if you click on the pictures. This is where KD came in! We welded the cuts back up, cleaned it, made it fount again, made it empty into its downstream counterpart (instead of under the house!) and concreted its knarly steel sides smooth.

jseinsideborderproppedupjb.jpg

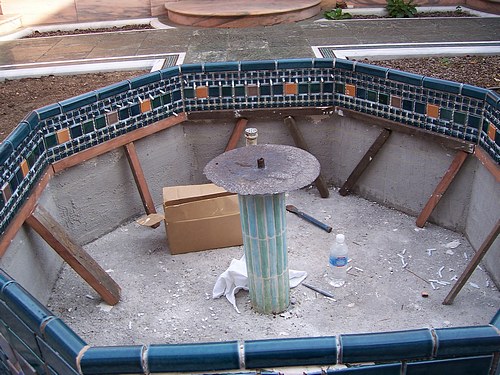
The inside border being installed, propped up with wood.

jsepregroutjb.jpg

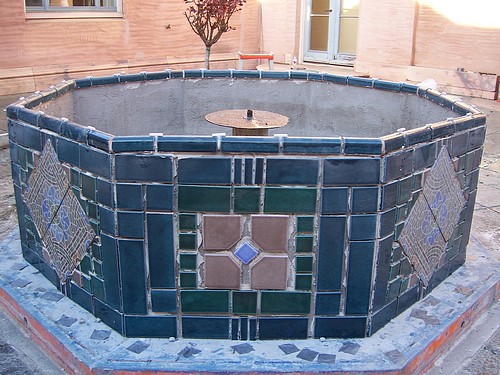
The square motive on the alternate sides. These sides were easier because the four central tiles were the same thickness as the other tiles.
 

jseftnwcherub.jpg

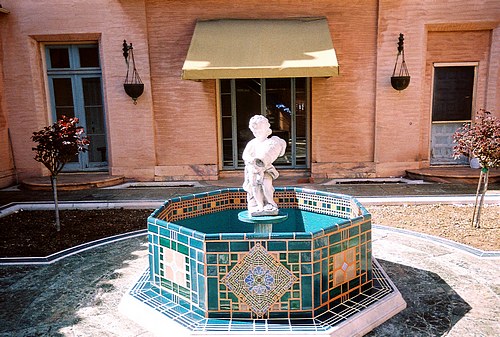
The original marble footings of the old fountain were cleaned up and reinstalled. The narrow base at the foot of the fountain was designed to echo the edgeing of the flower beds (yet to be planted).
We were unable to locate the material called Gunnite for the center of the fountain so we used "Zypex" to waterproof the concrete on the inside of the fountain. When this had hardened we painted it a turquoisy blue, to match some of the tiles and a staircase which is visible from this courtyard.

jsecourtyardftn30003.jpg

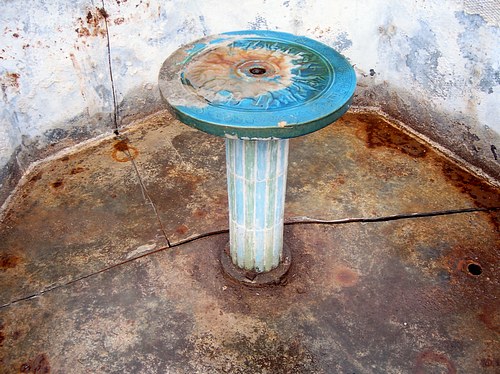
Remember, this is how it started out. Imagine what a new one would have cost, and it is doubtful that a new one would have lasted one hundred years - as this old one did.

jsefountaindesign2.jpg

Design for the alternate side of the octagon.
Design and choice of tiles are credited to artist, Jeannine Redon and  her computer assistant Ms. Tan Vess.

jsetilelayout2.jpg

The tile lay out for side two.
Click to see details.

jsecourtyardftn10001.jpg

The picture above and the one to the left (bottom) show the enormous open cuts left in the fountain after the failed demolision attempt. It also shows close ups of the awful state of decay of the metal hulk which was to be restored.

jsepregrout2jb.jpg

This is a close up of the "diamond" shaped rosette side. These are alternated by a square motive. We experienced a difficulty in the fact that the fancy center tiles were more than twice as thick as the rest of the tiles! We got ruond this by installing the thick tiles first then ramping the surface down to the two vertical edges. We were therefore tiling on a cylindrical suface for half of the job! We were lucky enough to find some cap tiles which fit like a glove, we bought most of the tiles (incl. caps) from Fireclay Tile of San Jose.

jsedecidingonbasejb.jpg

Choosing the pattern for the base. Main objective was to match the flower beds surrounds.

cherubwaitinginwingsjb.jpg

Cherub seen waiting in the wings.
.

jsecompletedftnjb.jpg

Remounting the cherub was a bit scary! It took two people to support it in a variety of positions while a third person tried to connect the tubes entering at its feet. Our first attempt caused the original, very old metal pipe to crumble! This presented a project unto itself. How to replumb a hole in a piece of concrete. We got round this by inserting some 1" tube into the hole, which fitted snuggly, but was much bigger than the cherub attachment. We stepped down to the cherub size by a series of tubes, one inside the other. By the time we finished the tube was too long to connect properly! I will not bore you with the fiddly details but we did it, and it was a struggle.